1. Overview
This document will help you to set up Visual Studio Code as a C++ IDE. This guide shows you how to deal with not only single cpp file but also multiple cpp files. At the end of this article, there is a video which shows you how to run debug for C/C++ by Visual Studio Code on Windows.
However, I don’t recommend that you should use this method for a real and big C/C++ project. Instead, you should use some build system such as GNU Make, CMake,
2. Assumption
Assume that you have already
- Installed Visual Studio Code on Windows.
- Installed
"MinGW"toolchain on Windows. - Set up Environment variable to use
"MinGW". (Tutorial here)
3. Notes
- In this document, I assume that
bindirectory of MinGW isC:\MinGW\bin. If you didn’t install or didn’t set up environment variable forMinGW, please do it, following some other documents. - Paths which I mentioned in this document is suitable for me, you should use your own paths.
4. Step by step
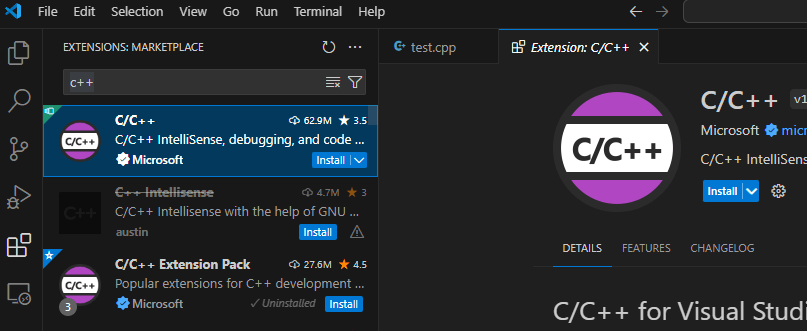
4.1. Install C/C++ extension
- Click ‘extension’ button and search for C/C++ extension. Install it.

- After installing
C/C++extension, a"run"button will appears every time you open ancppfile.

4.2. Set up tasks.json for 1 cpp file
4.2.1. Use
- This file has configs for building an executable file from source code.
4.2.2. Add task to tasks.json properly
-
Assume that your current root directory doesn’t have
tasks.json(or it exists but you don’t have suitable task to run C/C++ file) -
Assume that you open a
cppfile which definesmainfunction. -
click “down arrow” button > Select “Run C/C++ File”.
- VSC will prompt you to select some action which is detected automatically by VSC > Select
g++.exe.

- Code files will be compiled and run. And a
.vscode/tasks.jsonfile will be created if successfully.
4.2.3. Example of tasks.json
{
    "tasks": [
        {
            "type": "cppbuild",
            "label": "C/C++: gcc.exe build active file",
            "command": "C:\\MinGW\\bin\\gcc.exe",
            "args": [
                "-fdiagnostics-color=always",
                "-g",
                "${file}",
                "-o",
                "${fileDirname}\\${fileBasenameNoExtension}.exe"
            ],
            "options": {
                "cwd": "${fileDirname}"
            },
            "problemMatcher": [
                "$gcc"
            ],
            "group": {
                "kind": "build",
                "isDefault": true
            },
            "detail": "Task generated by Debugger."
        },
        {
            "type": "cppbuild",
            "label": "C/C++: g++.exe build active file",
            "command": "C:\\MinGW\\bin\\g++.exe",
            "args": [
                "-fdiagnostics-color=always",
                "-g",
                "${file}",
                "-o",
                "${fileDirname}\\${fileBasenameNoExtension}.exe"
            ],
            "options": {
                "cwd": "${fileDirname}"
            },
            "problemMatcher": [
                "$gcc"
            ],
            "group": "build",
            "detail": "Task generated by Debugger."
        }
    ],
    "version": "2.0.0"
}
Explanation of example
-
There are 2 tasks
- The first is for “C/C++:
gcc.exebuild active file”.- Command:
"C:\\MinGW\\bin\\gcc.exe"
- Command:
- The second is for “C/C++:
g++.exebuild active file”- Command:
"C:\\MinGW\\bin\\g++.exe"
- Command:
- The first is for “C/C++:
-
Remarks:
- We use double slash
\\instead of\because in JSON,\is a escape character.\will remove special meaning of the character which follow it. So the first\will remove special meaning of the second\.
- We use double slash
4.3. Set up tasks.json for multiple cpp files
If you want to compile several cpp files, please use the following example of the file tasks.json.
Example
{
    "tasks": [
        {
            "type": "cppbuild",
            "label": "C/C++: gcc.exe build active file",
            "command": "C:\\MinGW\\bin\\gcc.exe",
            "args": [
                "-fdiagnostics-color=always",
                "-g",
                "${fileDirname}\\*.cpp",
                "-o",
                "${fileDirname}\\${fileBasenameNoExtension}.exe"
            ],
            "options": {
                "cwd": "${fileDirname}"
            },
            "problemMatcher": [
                "$gcc"
            ],
            "group": {
                "kind": "build",
                "isDefault": true
            },
            "detail": "Task generated by Debugger."
        },
        {
            "type": "cppbuild",
            "label": "C/C++: g++.exe build active file",
            "command": "C:\\MinGW\\bin\\g++.exe",
            "args": [
                "-fdiagnostics-color=always",
                "-g",
                "${fileDirname}\\*.cpp",
                "-o",
                "${fileDirname}\\${fileBasenameNoExtension}.exe"
            ],
            "options": {
                "cwd": "${fileDirname}"
            },
            "problemMatcher": [
                "$gcc"
            ],
            "group": "build",
            "detail": "Task generated by Debugger."
        }
    ],
    "version": "2.0.0"
}
Explanation of example
"${file}"was replaced by"${fileDirname}\\*.cpp"(this pattern allow the compiler to compile allcppfile in the directory which contains the currentcppfile.) `
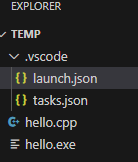
4.4. launch.json (optional)
Indeed, you can compile and run your program on Linux without this file, therefore you don’t need to read this section if you are using Linux. However, if you are using Windows or you want to customize “Run and Debug” configs, please follow this section.
If there is no “launch.json” file, default configs will be applied for “debugger”.
4.4.1. Use
- A
launch.jsonfile is used to configure the debugger in Visual Studio Code. (Reference: https://code.visualstudio.com/docs/cpp/launch-json-reference)
4.4.2. Create launch.json properly
-
Assume that you added task (in section 4.3)
-
Assume that you open a
cppfile which definesmainfunction. -
Click “Add debug configuration” button

- VSC will prompt you to select a valid task which should be run to build executable file. Here, I will choose
"g++"for compilingc++.

- A
"launch.json"file will be created if it hasn’t exist before. New configs of debugger will be added to the file.
Example of launch.json
{
    "version": "0.2.0",
    "configurations": [
        {
            "name": "C/C++: g++.exe build and debug active file",
            "type": "cppdbg",
            "request": "launch",
            "program": "${fileDirname}\\${fileBasenameNoExtension}.exe",
            "args": [],
            "stopAtEntry": false,
            "cwd": "${fileDirname}",
            "environment": [],
            "externalConsole": false,
            "MIMode": "gdb",
            "miDebuggerPath": "C:\\MinGW\\bin\\gdb.exe",
            "setupCommands": [
                {
                    "description": "Enable pretty-printing for gdb",
                    "text": "-enable-pretty-printing",
                    "ignoreFailures": true
                },
                {
                    "description": "Set Disassembly Flavor to Intel",
                    "text": "-gdb-set disassembly-flavor intel",
                    "ignoreFailures": true
                }
            ],
            "preLaunchTask": "C/C++: g++.exe build active file"
        },
        {
            "name": "C/C++: gcc.exe build and debug active file",
            "type": "cppdbg",
            "request": "launch",
            "program": "${fileDirname}\\${fileBasenameNoExtension}.exe",
            "args": [],
            "stopAtEntry": false,
            "cwd": "${fileDirname}",
            "environment": [],
            "externalConsole": false,
            "MIMode": "gdb",
            "miDebuggerPath": "C:\\MinGW\\bin\\gdb.exe",
            "setupCommands": [
                {
                    "description": "Enable pretty-printing for gdb",
                    "text": "-enable-pretty-printing",
                    "ignoreFailures": true
                },
                {
                    "description": "Set Disassembly Flavor to Intel",
                    "text": "-gdb-set disassembly-flavor intel",
                    "ignoreFailures": true
                }
            ],
            "preLaunchTask": "C/C++: gcc.exe build active file"
        }
    ]
}
Explanation of the example
- There are 2 elements of configs
- name “C/C++:
g++.exebuild and debug active file”- “preLaunchTask”: “C/C++: g++.exe build active file” -> it means that the task
"C/C++: g++.exe build active file"will be run to build*.exefile before launching*.exefile.
- “preLaunchTask”: “C/C++: g++.exe build active file” -> it means that the task
- name “C/C++:
gcc.exebuild and debug active file”- “preLaunchTask”: “C/C++: g++.exe build active file” ->-> it means that the task
"C/C++: gcc.exe build active file"will be run to build*.exefile before launching*.exefile.
- “preLaunchTask”: “C/C++: g++.exe build active file” ->-> it means that the task
- name “C/C++:
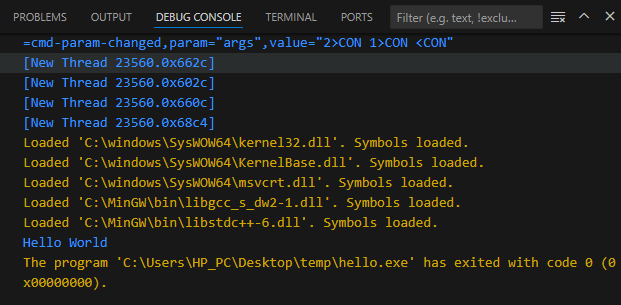
The source code cannot be run proplerly on Windows?
If you put some C/C++ code for user to input charaters, maybe you will find out that the terminal won’t display as your expectation. To fix it, modify the “launch.json” file, changing “externalConsole” from "false" to "true". Watch the following clip for details:


Leave a reply to Visual Studio Code là một công cụ tốt để học và làm việc với C/C++ – Coder Tiger Cancel reply